RetouchPi: Remove Background Online, as a Layer Mask
Remove Background lives in the Layer ▸ Mask menu and took 119 ms in measurement. What it hands back is not a new picture; it is a mask attached to the layer you were on - not one pixel of the original moved, and that mask can still be inverted, feathered, or painted back by hand.
Updated 2026-10-09 · ~ 1497 words
Hand it the picture
Pick one and you land in the editor, with the cutout waiting in the menu. A product shot on white, a studio portrait, a scan - all fine. White on white is refused, and the reason is below.
Five steps, none of them hidden
- Pick the picture in the well at the top of this page, or use File ▸ Open (Ctrl+O) inside the editor.
- Select the layer you want cut out in the layers panel: the mask lands on the layer that is current, so pick it first.
- Use Layer ▸ Mask ▸ Remove Background - it is the first entry in the mask block.
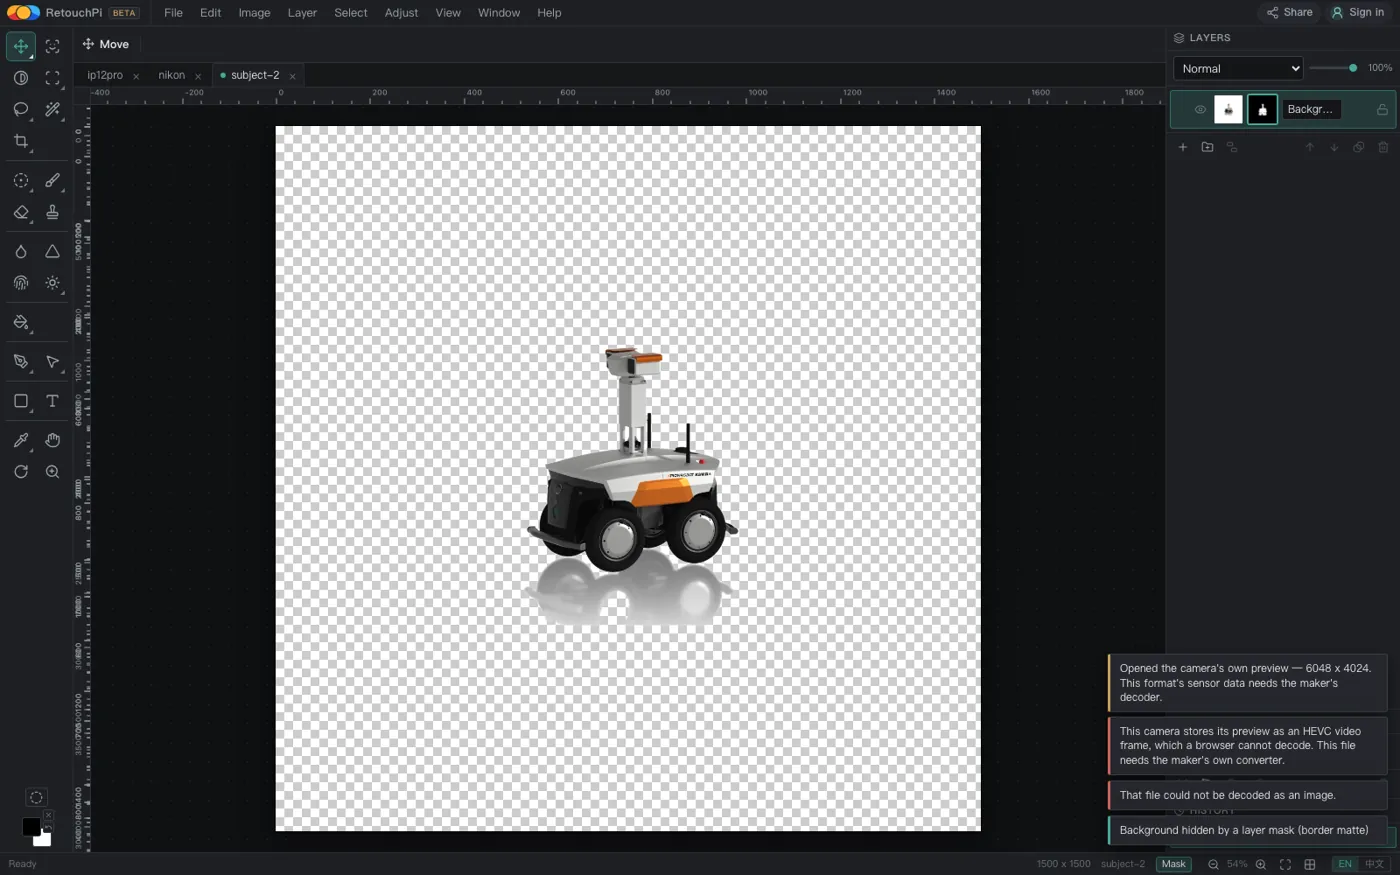
- Check two things: the notice says "Background hidden by a layer mask (border matte)", the layer grows a mask thumbnail in the panel, and the background on the canvas turns to chequerboard.
- Take it out. To keep the transparency use File ▸ Save as PSD or
Export SVG; for a flat deliverable useExport PNG,Export JPEGorExport WebP, which press the picture onto the background colour you chose. See "Three roads out" below for the difference.
Why the result is a mask and not a new picture
Most one-click background removers hand back a flattened new picture: the background is deleted, the pixels underneath are gone with it, and changing your mind means starting over. This one does not. It computes a mask, attaches it to the current layer, and leaves every pixel of that layer exactly where it was - the hidden part simply does not show.
- Turn the mask off with its eye in the layers panel and the background is back; delete the mask and the layer is as if it had never been cut.
- The mask is grayscale, so it is soft: the edge can carry a partial transition instead of a ring of jaggies. That is what "border matte" in the notice means.
- Afterwards it is an ordinary layer mask: paint black or white on it, invert it, feather it, rebuild it from a selection. It is not a one-shot, locked result.
Measured: 119 ms, and one refusal
Two runs on 2026-10-09, in the same bundled Chromium. The first was a studio product shot on a 96%-white background, 1500 x 1500: a mask in 119 ms, the notice reading "Background hidden by a layer mask (border matte)", a mask thumbnail in place in the layers panel, and chequerboard where the background was.
The second was a white object on a 99%-white background: 277 ms, refused, the notice reading "Nothing to keep: every pixel looked like the background", and the document untouched. White on white has no answer anyway - saying so beats handing you an empty picture.
If the edge is not right, the mask is still yours
A mask computed in one click will not always be right: hair, glass, voile - anything partly transparent may need another pass. Because it is a real mask, these commands all work on it directly:
- Paint on the mask: black hides what was left in, white brings back what was taken out. It is the move you use most, and it is the one a flattened copy cannot offer.
- Layer ▸ Mask ▸ Feather Mask… turns a hard edge into a soft one.
- Layer ▸ Mask ▸ Invert Mask (Ctrl+I) flips it when it got the two sides the wrong way round - for example when it kept the background as the subject.
- Layer ▸ Mask ▸ From Selection: draw your own outline with the lasso or the wand and let the mask follow it.
- Reveal All / Hide All: reset the whole mask in one click, so you can go again without deleting and rebuilding it.
Three roads out: which ones carry transparency
This is the part that matters most on this page, because it was measured rather than assumed:
| Export | Is the mask still there | Measured |
|---|---|---|
| PSD (Save as PSD) | Yes. Layers and masks are written back layered and stay editable next time. | The proper road for transparency |
| SVG (Export SVG) | Yes. In the vector export the cutout is a <mask> element, not pixels baked in. | 413 KB from the same document, containing one <mask> |
| PNG / JPEG / WebP | No. The export presses the document flat onto the background colour you picked. | PNG exported after a cutout: alpha = 255 at all four corners |
So this page never says "export a transparent PNG": it cannot, and saying so would waste the reader's trip. For a transparent picture to place into another layout, take the PSD or the SVG; for a deliverable to ship, set the background colour to the one you want first, then export PNG.
What this page does not claim
- It is not a per-strand segmentation model. What it computes is a border matte (the notice says so itself). Hair, glass and voile need another pass on the mask - the tools are there, but it does not pretend one click finishes the job.
- White on white is refused, by name ("every pixel looked like the background"), rather than returning an empty picture.
- PNG, JPEG and WebP do not leave with transparency (alpha = 255 at the corners, measured). Transparency has two roads: PSD and SVG.
- This is not the AI edit step. The cutout is ordinary local retouching; AI generation and edits are the only step that reaches a server, priced in credits. The 119 ms on this page belongs to the first group.
Questions people ask
Can I export a PNG with a transparent background after cutting it out?
Not in this version, and it was measured: PNG, JPEG and WebP exports press the document flat onto the background colour you picked (alpha = 255 at the corners). To carry transparency away, save a PSD, which writes layers and masks back layered, or export SVG, where it is a <mask>. For a flat deliverable, set the background colour you want first and then export.
The edge is rough or has a white halo. What then?
The result is a mask, so it can be fixed: paint the halo away with black on the mask, or use Layer ▸ Mask ▸ Feather Mask… to soften a hard edge. If it got the sides wrong, Ctrl+I inverts it. To do it entirely yourself, draw a selection and use From Selection so the mask follows your outline.
Does it work on a product shot with a white background?
It does; that is exactly what was measured: a studio product shot at 1500 x 1500 on a 96%-white background produced a mask in 119 ms. White on white does not work - a white object on a 99%-white background was refused by name ("every pixel looked like the background") and the document was left alone. The subject and the background need some difference for it to have anything to compute.
If it gets it wrong, is the original picture ruined?
No. Not one pixel of the original layer is altered; all that happens is that a mask is attached to it. Turn off the mask's eye and the background returns; delete the mask and the layer is as if it had never been cut.
Can it cut out several layers at once?
It acts on the layer that is current, and the mask lands on that layer. For a second layer, select it and click again - the upside is that each layer keeps its own mask, so they do not interfere and you can switch any one of them off.
Does this step send my picture to a server?
Ordinary retouching - decoding, editing, exporting, this cutout included - stays on your machine. AI generation and AI edits are the only step that reaches a server, priced in credits and quoted before you commit.
Is this the same thing as the AI edit?
No. The cutout is a deterministic local command: the same picture clicked twice yields the same mask, it costs no credits, and it runs in the 119 ms range. An AI edit generates new pixels from your prompt, reaches a server, costs credits, and lands back on the rectangle of the layer it came from. Both exist, but they are not the same act.
Read next
- Open camera RAWSeven real camera files, measured one by one
- ID photoSix named sizes, exported at 300 dpi
- Edit PSD onlineOpens layered, edit one layer, saves back layered
- JPEG to PDFOne pixel per point, read back byte by byte
- AI pricingOne credit is one US cent, tier by tier
- CapabilitiesWhat it opens, and what it exports
- Open CMYK filesNine samples opened, 254-261 ms each
- CMYK vs sRGBOne file, two colour spaces, a measurable gap
- Where the ads come fromZero ad slots on the canvas, screen-share maths
- Ad-free editingAd-free is a one-time purchase, not a subscription
- AI editing and layersResults land back on the source layer's rectangle, ±3 px
- Where your file goesEight actions, request lists, zero picture bytes out
Try it on one of your own
No account, no credits. There is one menu path: Layer ▸ Mask ▸ Remove Background. After it runs, look at the mask thumbnail in the layers panel - if it is there, your original still is too.
As an Amazon Associate, we earn from qualifying purchases.